
-
By

- February 26, 2025
- Camera Features & Technology
Surveillance Camera Resolution: How to Capture Crystal-Clear Footage and Protect Your Home
Home security cameras are supposed to give you a clear view of what’s happening around your property. But if the footage is too blurry to recognize a face or read a license plate, what’s the point? The resolution and image quality of a security camera determine how useful the footage actually is. This guide breaks down everything homeowners need to know about surveillance camera resolution and how to get the best image quality possible.
1. What Is Surveillance Camera Resolution?
Surveillance camera resolution refers to the number of pixels in an image or video. More pixels mean more detail, which makes it easier to recognize faces, license plates, and other important details.
How Resolution Works
- Higher resolution = sharper images. More pixels allow for better clarity.
- Lower resolution = blurry images when zooming in. Fewer pixels result in loss of detail.
- Resolution is measured in pixels. It’s usually written as width × height (e.g., 1920 × 1080 for Full HD).
Common Surveillance Camera Resolutions
Different cameras come with different resolutions, and each has its own strengths and weaknesses.
| Resolution | Pixel Dimensions | Best For |
| 720p (HD) | 1280 × 720 | Basic monitoring, small indoor spaces |
| 1080p (Full HD) | 1920 × 1080 | Standard home security, clear details at moderate distances |
| 1440p (2K) | 2560 × 1440 | Better for identifying faces, license plates, and small details |
| 2160p (4K Ultra HD) | 3840 × 2160 | Best for large areas, highest clarity, forensic detail |
What Surveillance Camera Resolution Do You Actually Need?
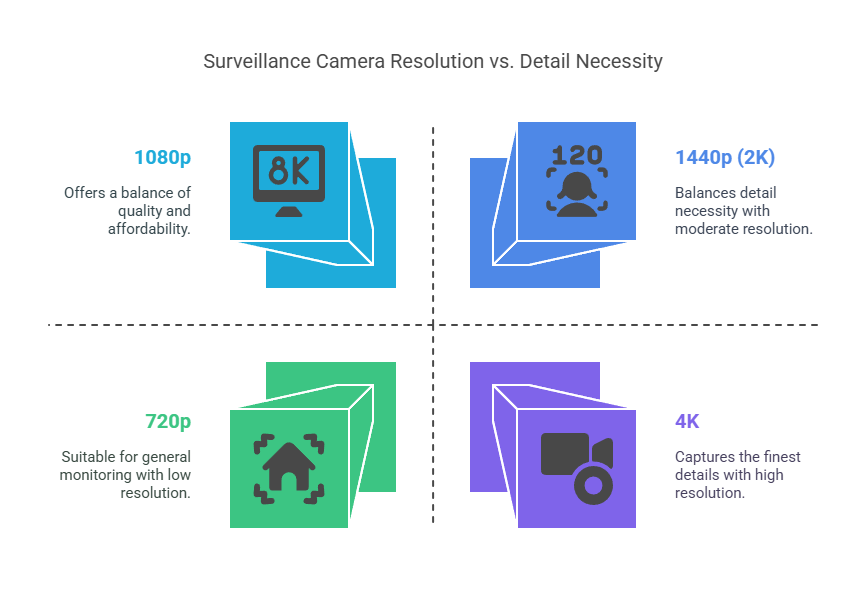
- 720p: Fine for general monitoring indoors.
- 1080p: A great balance of quality and affordability for most homeowners.
- 1440p (2K): Ideal for spotting details like facial features or license plates.
- 4K: Overkill for some, but the best for capturing the finest details.
For most homes, 1080p or 2K cameras work well. If you have a large property or need crystal-clear details, 4K is worth considering.
2. Image Quality vs. Resolution: What’s the Difference?
Resolution is important, but it’s not the only thing that affects how good your security camera footage looks. You could have a 4K camera, but if other factors aren’t right, the image might still look bad.
Here’s what else plays a role in security camera image quality:
1. Frame Rate
- Measured in frames per second (FPS). The higher the frame rate, the smoother the video.
- Lower FPS (10-15 FPS) can result in choppy, laggy video.
- Higher FPS (30+ FPS) captures smoother movement and reduces motion blur.
2. Bitrate
- Bitrate controls how much data the video stores per second.
- Low bitrate = more compression = pixelated, blurry footage.
- Higher bitrate = better quality, but requires more storage and bandwidth.
3. Sensor Size
- A larger image sensor captures more light, improving clarity and low-light performance.
- Many cheap cameras use small sensors, making footage look dull or grainy.
4. Field of View (FOV)
- A wider FOV captures more area but can distort objects at the edges.
- A narrower FOV focuses more on specific details but might miss action outside the frame.
How These Factors Work Together
A high-resolution camera with bad bitrate, low FPS, or a cheap sensor can still produce terrible footage. The best security camera for your home needs the right balance of resolution, frame rate, bitrate, and sensor quality.
3. Key Factors That Affect Security Camera Image Quality
Just because a camera claims to be 4K doesn’t mean the footage will always be crisp. Several factors impact the overall quality of the video.
1. Lens Quality
- A high-quality glass lens produces sharper images than a cheap plastic lens.
- The aperture size affects how much light enters the camera—wider apertures improve low-light performance.
2. Lighting Conditions
- Bright sunlight can cause glare and overexposure.
- Low light can lead to grainy, noisy images.
- Night vision cameras use infrared (IR) to improve clarity in darkness.
- HDR (High Dynamic Range) helps balance light and dark areas in high-contrast scenes.
3. Camera Placement
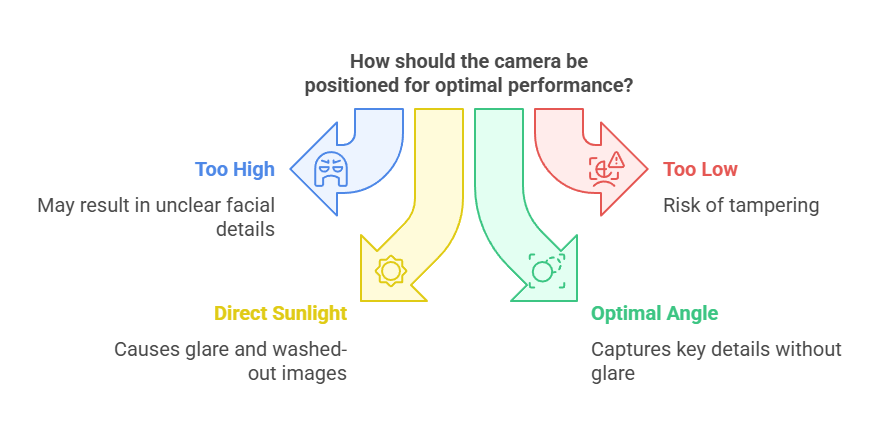
- Too high? You might not get clear facial details.
- Too low? Someone could tamper with it.
- Facing direct sunlight? Expect glare and washed-out images.
- Best practice: Place cameras at an angle that avoids glare but still captures key details.
4. Network & Bandwidth (For IP Cameras)
- Wi-Fi cameras depend on a strong internet connection. Weak signals cause lag, lower resolution, and choppy video.
- Wired cameras (PoE) have more stable connections and better video quality.
- Solution: Use a strong Wi-Fi signal or wired setup for the best performance.
5. Storage & Compression
- H.264 vs. H.265 Compression:
- H.264 uses more storage but maintains better quality.
- H.265 reduces file size while keeping decent quality.
- Over-compressed video can look pixelated, even at high resolution.
6. Weather Resistance & Durability
- Outdoor cameras need to handle rain, snow, and extreme temperatures.
- Look for a high IP (Ingress Protection) rating to ensure durability.
- Fog and water droplets on the lens can ruin footage—some cameras have built-in anti-fog features.
7. Firmware & Software Updates
- Old firmware can cause glitches, lag, and security risks.
- Regular updates improve image processing, AI detection, and camera performance.
4. How to Improve Security Camera Image Quality
If your security camera footage looks blurry, pixelated, or too dark, there are ways to fix it. Here are the best ways to improve surveillance camera resolution and image quality.
1. Choose the Right Resolution for Your Needs
Not every home needs a 4K security camera. The right resolution depends on where and how you’re using it.
- Entryways & front doors → 1080p or 2K is usually enough.
- Driveways & garages → 2K or 4K to capture details like license plates.
- Large yards & backyards → 4K provides the best coverage and clarity.
2. Optimize Camera Placement
- Mount cameras at eye level (or slightly higher) for better facial recognition.
- Avoid direct sunlight to prevent glare and overexposed images.
- Keep cameras sheltered to avoid rain or snow interfering with the lens.
- Angle cameras strategically so they don’t capture unnecessary areas like the sky.
3. Improve Lighting Conditions
- Add motion-activated lights to help cameras capture clear nighttime footage.
- Use IR (infrared) or starlight cameras for better low-light performance.
- Position cameras away from direct bright lights to avoid overexposure.
4. Upgrade to a Better Lens or Sensor
- Glass lenses outperform plastic lenses in clarity and sharpness.
- A larger image sensor improves low-light performance and reduces grainy footage.
5. Ensure a Strong Network Connection (For Wireless Cameras)
- Weak Wi-Fi = blurry, choppy video. Improve this by:
- Using a Wi-Fi extender to strengthen the signal.
- Hardwiring your camera (if possible) for a stable connection.
- Upgrading to a better router with stronger coverage.
6. Adjust Camera Settings for Better Image Quality
Most security cameras allow you to tweak settings for optimal performance.
- Increase the bitrate for sharper images.
- Turn on HDR to balance bright and dark areas.
- Adjust exposure settings to prevent washed-out footage.
- Reduce over-compression to avoid pixelation.
7. Regular Maintenance & Updates
- Clean the camera lens with a microfiber cloth to remove dirt, dust, and water spots.
- Trim nearby trees or bushes to prevent obstructions.
- Update firmware and apps to improve performance and security.
5. Getting the Best Image Quality for Your Home Security System
Security cameras are only as good as the image they capture. A high-resolution camera doesn’t always guarantee clear footage, and a low-resolution camera isn’t automatically useless. The key is finding the right balance between resolution, lighting, placement, and settings to get the best results.
Key Takeaways for Homeowners:
- Choose the right resolution. 1080p or 2K is fine for most homes, but 4K is best for large areas or high-detail needs.
- Place cameras strategically. Avoid glare, mount at the right height, and angle them properly.
- Lighting matters. Use motion-activated lights and cameras with night vision to improve clarity.
- Network stability affects video quality. A weak Wi-Fi signal can make even a 4K camera look bad.
- Check and update settings. Increase bitrate, enable HDR, and fine-tune exposure for better image quality.
- Keep cameras clean and updated. Dust, rain, or old firmware can impact performance.
If you’re setting up or upgrading your home security system, focus on more than just resolution. A well-placed 1080p camera with good lighting and the right settings will often outperform a 4K camera with poor placement and weak lighting.A little planning goes a long way toward getting clearer, more useful security footage.

1 Comment
Best Home Security Cameras in 2025 - Resident Overwatch
1 day ago[…] one wants a blurry security feed. The higher the resolution, the clearer the image, which means better details, like reading license plates or recognizing […]